Ghostbusters Pronton Blaster
Summary
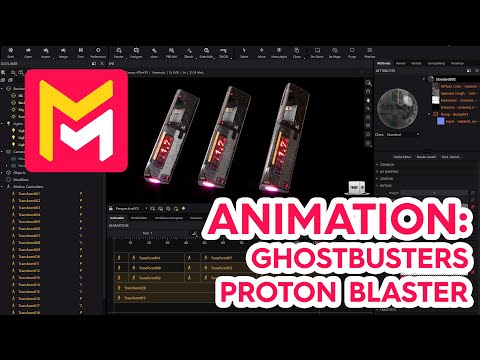
This YouTube tutorial from Maverick Render demonstrates advanced animation techniques in the software. The video focuses on creating a rhythmic, sequential rotation of multiple objects using transform motion controllers. Specific steps are detailed, including adjusting easing options, cloning assemblies, and manipulating timelines to achieve the desired effect. Camera animation is also incorporated to enhance the final product. The tutorial aims to teach viewers how to create engaging, looping animations. Finally, the video encourages viewers to download the model and experiment.
F.A.Q.
-
How can I create an animated rotation of an object in Maverick Render? To animate a rotation, you'll use a transform motion controller. Apply this controller to your object, then set the desired rotation at a specific point on the timeline. You can adjust the speed by shortening the controller's duration. The easing options and a custom profile will allow you to finely control the animation to include a "push," pause, or any other effect.
-
What are easing options and why are they useful? Easing options provide control over the animation's acceleration and deceleration. Instead of a constant linear motion, easing allows for more nuanced movements like a slight initial push, a pause, or a rapid finish, making animations more dynamic. You can further customize these effects by creating a custom profile.
-
How do I create a "push" effect at the beginning of a rotation animation? To create a "push" effect, go to the easing options of the motion controller and add a custom profile. By moving a point on the graph below the zero coordinate on the Y axis, the object will initially move in the opposite direction before rotating in the intended direction, creating the effect.
-
How can I make multiple objects rotate in a sequential, rhythmic manner? First, you animate one object and then clone it, along with its motion controller. Next, adjust the cloned object's motion controller timeline so it starts its animation after the first object completes its rotation. By moving and adjusting each object's motion controller on the timeline, you can create a sequence of rotations. You can also use repeat options to make rotations loop in a synchronized way.
-
How do I get multiple objects rotating at different times? You can move the starting position of the animation on the motion controller timeline. By moving the second object's motion controller so it only starts moving after the first object completes one rotation, you can create a sequential rhythmic effect.
-
How do I animate the camera around a specific point of interest? To animate the camera around a specific point, add a motion controller to the camera and create a target in the center of your scene or specific area of interest. Activate the pivot option on the camera's motion controller, and select this new target. This allows the camera to rotate around that target instead of rotating around the default rotation point.
-
Can I apply multiple motion controllers to a single object or camera? Yes, you can apply multiple motion controllers. For example, you can use one motion controller for the camera's main rotation around a target, and then add a second motion controller for a different axis tilt or rotation, adding complex layered motion.
-
Once I'm done setting up my animation, how do I preview it and render it? After you’ve set up all the motion controllers and animations to your liking, you can preview the final animation directly from the timeline panel in Maverick. From there, you can then proceed to render the video.