Lens Effects
Presentation
Summary
This YouTube video tutorial demonstrates how to use new lens effects features in Maverick Studio and Indie rendering software. The tutorial provides multiple examples showcasing how to utilize vignetting, diffraction, bloom, and glare effects. It emphasizes using threshold settings within the software to precisely control the application of these effects to specific areas of a scene. The video stresses that adjustments to lens effects don't necessitate re-rendering, encouraging users to experiment freely. Finally, the tutorial aims to help users create realistic and artistic photographic lens effects in their renders.
F.A.Q.
-
What are the new lens effects available in the latest release of Maverick Studio/Indie? The latest release introduces several lens effects including vignetting, chromatic aberration (fringe), bloom, and glare. These effects aim to enhance the realism and visual appeal of renders by simulating the imperfections and characteristics of real-world lenses. The lens effects are found in the Tone Map panel, under the "Lens" tab.
-
How does vignetting work in Maverick? Vignetting simulates the darkening of the edges of an image. In Maverick, you can control the hardness of the vignetting, its midpoint which determines its center, and you can also shift it from rectangular to square shape to achieve different artistic or physically accurate effects.
-
What is chromatic aberration (fringe) and how is it used? Chromatic aberration, often called fringe, is a lens effect that creates color fringes around high-contrast areas of an image. In Maverick, you can use the fringe option to add this touch of realism, simulating the way light is refracted differently through a real lens.
-
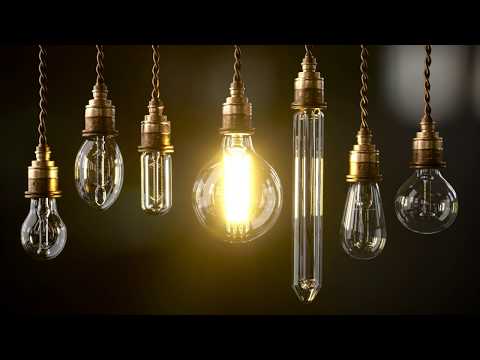
How do Bloom and Glare effects enhance images in Maverick? Bloom and glare simulate the light diffusion and starburst patterns that occur around bright light sources. Bloom adds a soft glow, while glare creates a more defined star-like pattern. These effects add realism and visual interest, making the rendered images feel more lifelike and photographic.
-
How can I control and constrain Bloom and Glare effects to specific areas of my scene? Maverick uses threshold settings to control bloom and glare. By adjusting the low and high threshold values, you can limit the effect to areas of specific brightness. The show clipping feature provides a visual mask, allowing users to see where the effect will be most prominent (white), where it will be dimmed (black), and where it will be partially applied (gray). By raising the low threshold and its bias, the effects are removed from the darker areas of the image. By raising the high threshold, you can narrow the areas receiving the effects, thereby isolating highlights. Raising the high bias pre-amplifies the intensity of the highlighted areas exclusively, further focusing the effects.
-
How do material emission power adjustments interact with bloom and glare? Adjusting the emission power of a material will significantly impact bloom and glare effects. By increasing a material's emission power, you can make it a more prominent light source, thus increasing its impact on bloom and glare. The show clipping feature allows you to visualize how changes to material emission affect the distribution of bloom and glare, making it easier to fine-tune both.
-
What parameters can be modified in the iris section of the lens effects? The iris section allows for modifying parameters such as rotation, blade curvature, and aspect ratio of the lens effects. Experimenting with these sliders can give you a wide variety of artistic looks.
-
Is there a performance consideration when using lens effects in Maverick Studio/Indie? Editing the lens effects does not trigger a re-render as long as the effects are enabled. Therefore, it's recommended to enable lens effects early in your workflow and then adjust the sliders as necessary to achieve your desired look efficiently and in real-time.