Introduction
Summary
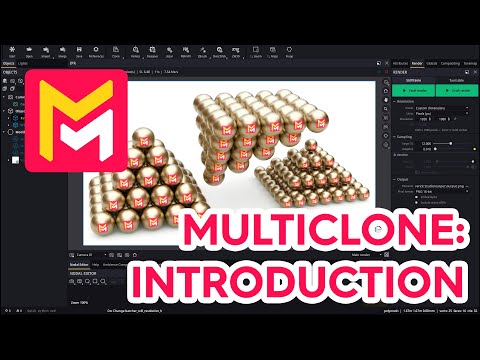
This YouTube video tutorial introduces Maverick Render's new multi-clone feature, a modifier for creating arrays of cloned objects. The tutorial explains how to add the modifier, access and utilize its numerous attributes (instance counts, stacking, rotation, polar arrangement, hollowing, skewing, zippering, and randomization), and ultimately convert the cloned instances into independent polymesh geometry. Various examples illustrate creating different arrangements, including linear, circular, spiral, pyramidal, and interlaced patterns. The video emphasizes the intuitive nature of the tool and encourages experimentation.
F.A.Q.
-
What is the Multi-Clone feature in Maverick Render, and what is it primarily used for? The Multi-Clone feature in Maverick Render is an object modifier that allows users to easily create arrays of cloned objects. It's primarily used to generate attractive and visually compelling product arrays for marketing presentations, making it easy to display multiple instances of a product in a structured and visually appealing manner.
-
How can you add the Multi-Clone modifier to a scene? The Multi-Clone modifier can be added in two ways: either by selecting an object and using the "Create and Connect" option from the context menu, which immediately spawns a clone array, or by selecting it from the toolbar's object panel and dropping it onto an object or object group.
-
What are some of the key attributes you can control within the Multi-Clone modifier? The key attributes of the Multi-Clone modifier include instance counts per axis (positive and negative direction), stacking (which ensures instances are tightly packed), separation between instances, rotation of the entire array or individual instances, and options for creating polar (circular), spiral, helicoidal, hollow, skewed (pyramidal), and zipper (interlaced) arrangements. You can also control the radius, reorientation, angle, and other geometric parameters. Additionally, you can randomize position, rotation, and scale of the clones and also randomize the material color.
-
How do the "stacking" checkboxes affect the arrangement of clones? The "stacking" checkboxes ensure that instances are tightly packed next to each other along the axes. When toggled off, users can freely adjust the separation between individual instances, thus allowing for creating more loosely spaced arrays.
-
Can you create circular or spiral arrangements using the Multi-Clone feature? Yes, the Multi-Clone modifier has a "polar" roll-up that enables the creation of circular or cylindrical arrangements. This feature allows users to control parameters like radius, reorientation to center, and the angle of each instance or the total rotation angle. It also has spiral/helicoidal options that can allow instances to be arranged in a helix/spiral shape, controlling the height and pitch.
-
What does the "hollow" roll-up allow you to do? The "hollow" roll-up lets users create tubings, walls, or frame-like structures by removing instances from the original lattice structure. It also allows users to create a "box frame," by creating a hollowed out box with hollowed out faces, as long as the original lattice provides enough instances to complete the frame.
-
How do the "skew" and "zipper" roll-ups alter the arrangement of clones? The "skew" roll-up can create pyramidal arrangements by trimming out instances, thus creating a slanting lattice, with controls for clipping or shearing the top of the pyramid. The "zipper" roll-up allows users to interlace rows or columns, creating a staggered effect with shift offsets, along with rotation or scale for the shifted rows.
-
How can you convert multi-clone instances into editable polymesh geometry? The multi-clone array of instances can be converted to actual polymesh geometry by clicking "convert to polymesh". This results in a group where each clone becomes an independent polymesh node. Once converted, the instances are no longer linked to the multi-clone modifier and can be moved, edited, or deleted individually. To maintain color randomization, the color randomization type needs to be changed from "instance ID" to "object ID" in the color node.