LG Xboom Go PK7
Summary
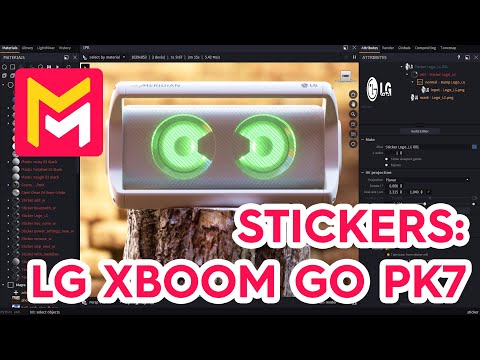
This YouTube video tutorial demonstrates how to use stickers in the Maverick Render software. The tutorial shows the process of applying various sticker images, adjusting their size, position, rotation, and material properties. Specific examples include adding logos and text stickers, utilizing alpha masks for seamless integration, and blending bump maps for realistic effects. The techniques shown involve dragging and dropping images, manipulating parameters in the software's interface, and utilizing pre-made assets from the Maverick library. The video concludes with showcasing the final rendered scene.
F.A.Q.
-
What types of image files can be used for stickers in Maverick Render? Sticker images can be in PNG or TIFF format, and they should include an alpha mask which is used to create the transparent areas of the sticker. This allows for irregularly shaped stickers to be placed on 3D models.
-
How are stickers initially added to a 3D model in Maverick Render? To add a sticker, you simply drag and drop the image file onto the desired model. When prompted in a dialog box you select "sticker". This will automatically create the sticker and activate the surface mode in the move tool, which allows you to slide the sticker on the model's surface.
-
What adjustments can be made to a sticker's placement and size? After a sticker is placed, its position on the surface of the object can be adjusted using the surface mode of the move tool. You can modify the sticker's size using its reel size attribute which controls the overall scaling. Additionally, there is an internal rotation attribute that allows you to rotate the sticker relative to the surface it is placed upon.
-
Can the visual properties of the sticker be modified, such as material type and bump effects? Yes, the material type of a sticker can be modified, for instance, switching to plastic. This enables you to see how a sticker interacts with a specular component. You can also adjust the sticker's bump mapping, reducing the blur radius to narrow the bump bevel. Furthermore, you can blend the sticker's bump with that of the underlying object.
-
How can symmetry be achieved when placing stickers on both sides of a model? To ensure symmetry when placing stickers on both sides of an object, you can clone a sticker and then negate its rotation. This means flipping the rotation direction (e.g. from 45 degrees to -45 degrees) and placing the cloned sticker on the opposite side of the model. This allows you to create mirrored sticker placement.
-
Can pre-existing images and elements be used as stickers? Yes, you can add stickers from stock images provided in the Maverick library. You can choose and add them in the design area of the application. These can include symbols like a power icon, for example. You adjust size, position, and rotation just like the image based stickers. You can also adjust its material type and diffuse weight.
-
Can substance files (SBSAR) be used as stickers in Maverick Render? Yes, you can use substance files (SBSAR) as stickers. After dropping the SBSAR file onto the model, you can adjust the size and orientation. Then in the properties of the SBSAR node, you can adjust text and other parameters for example. This is good for adding dynamic text and designs to stickers.
-
Are there any tools in Maverick to assist in sticker placement and transform? Yes, after adjusting the size and position of a sticker you can accept the transform in the floating panel, which saves the settings and completes the placement. It is recommended that you hide the sticker gizmo once the transform is complete to improve visualization and prevent any accidental changes.