Monitor
Summary
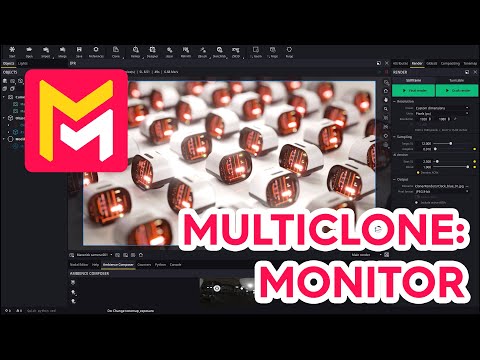
This YouTube tutorial demonstrates the "multi-clone modifier" feature in Maverick Render software. The tutorial uses a sci-fi monitor model, freely available via a link in the video description, to illustrate the modifier's capabilities. The multi-clone tool is shown to easily create visually appealing arrangements of multiple copies of the model, offering various options for spacing, rotation, and depth of field effects. The video emphasizes the tool's speed and efficiency in generating complex product shots. The presenter encourages viewers to experiment with the modifier's settings to achieve different aesthetic results.
F.A.Q.
-
What is the primary function of the multi-clone modifier in Maverick Render? The multi-clone modifier is a powerful tool designed to quickly create arrays of a selected object, enabling users to easily generate visually appealing arrangements. Instead of manually duplicating and positioning an object, the modifier automatically creates multiple instances, which can be configured to achieve varied layouts. This is particularly useful when trying to create interesting photographic setups of a single model.
-
How does the multi-clone modifier streamline the creation of product shots? The multi-clone modifier significantly simplifies creating dynamic and attractive product shots. Instead of relying on a single instance of a model which may appear monotonous, this modifier allows you to arrange multiple clones in an array, controlling their position, rotation, and spacing. This enables the user to generate unique and eye-catching compositions with minimal effort, creating more interesting arrangements than would be possible manually.
-
What are the basic steps to apply the multi-clone modifier to an object in Maverick Render? First, you create a multi-clone modifier, then you drag and drop the new modifier onto the group containing your object. This automatically creates a default array. You can then customize the layout by adjusting parameters such as the number of clones, the spacing, and the rotation of the instances.
-
How can you control the spacing between cloned objects using the multi-clone modifier? The multi-clone modifier allows precise control over spacing. You can disable the stack options in the modifier, which allows you to freely set separation distances along each axis. This enables you to create specific layouts, which gives you complete freedom in creating separation between cloned objects.
-
How does the 'zipper feature' improve the visual appeal of cloned object arrangements? The zipper feature is designed to break the monotony of repeating patterns. By shifting every other row or instance within the array, the zipper feature creates a more dynamic and visually interesting arrangement. Combined with rotation, this provides an easy and rapid way to generate visually complex layouts that would be tedious to produce manually.
-
How does rotating the frame of reference impact the cloned objects and the source object? Rotating the frame of reference will rotate the array of clones. Importantly, the source object itself does not rotate, because it is not part of the clone array. However, enabling the 'overlap' option includes the source object in the rotation. Users can also hide the original source object from view once they are satisfied with the configuration of the array.
-
Can the multi-clone modifier be used in conjunction with camera depth of field for better visual results? Yes, the multi-clone modifier is highly effective when used in combination with camera depth of field. The arrangement of the clones created with this tool creates a visually complex scene in which the camera depth of field can be used to great effect, and is useful in generating photoreal product shots that appear dynamic and visually stunning.
-
What is a useful keyboard shortcut when using the camera depth of field? Ctrl + Shift + Left Click is used to set where the camera is focused at when using the depth of field effect. This allows you to precisely control the focus point and draw attention to the areas in your scene that you want to highlight.